

How To Change Administrator Name In Windows 7
How to alter a user business relationship to an administrator account
Updated: 11/06/2021 by Reckoner Hope
An administrator account tin create additional user accounts, install software, and complete other tasks on a computer. If a standard user account needs to be changed to an administrator account, choose the advisable operating system beneath and follow the steps provided.
Note
The post-obit steps crave you have access to an ambassador account. If not, you tin can't grant administrator privileges to another user.

Windows 8, 10, and 11
- Press the Windows key, type Control Panel, and then press Enter.
- Nether the User Accounts section, click Alter account type.

- Select the account you lot want to grant authoritative rights.

- With an business relationship selected, click the Change the account type link.

- Click the circle adjacent to Ambassador (A) and click the Change Business relationship Type button (B).


Windows Vista and 7
- Open the Command Console.
- Click the User Accounts pick.
- Click User Accounts again, and then the Manage User Accounts choice.
- Discover the user account y'all want to modify under the Users for this calculator section on the Users tab. Click that user business relationship proper noun.
- Click the Properties pick in the user account window.
- Select the Administrator group to set the user account to an ambassador account on the Grouping Membership tab.
- Click the OK button to relieve the changes. Click OK on whatever additional windows to shut out the user account settings.

Windows XP
- Open the Control Panel.
- Double-click the User Accounts option.
- Click the user business relationship name you want to change to an ambassador.
- Click the Change the account type option.
- Select the Figurer administrator option, then click the Change Account Type push button.
Culling method
- From the Windows desktop, correct-click My Figurer.
- Click Manage, which should open the Computer Direction window, as shown beneath.
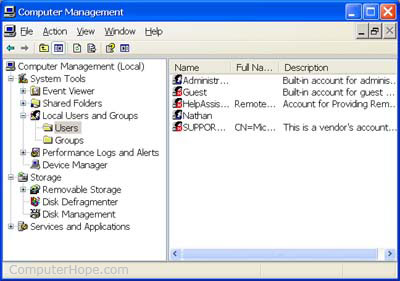
- Click the + side by side to Local Users and Groups or double-click it. Annotation: If y'all cannot access this section, you likely do not have administrator rights to the computer.
- Click Users, and in the right pane, all user accounts set up on your computer are shown.
- Double-click the account you lot want to view.
- Click Fellow member of.
- If the user is a member of "Administrators," that account already has authoritative rights. If this group is not listed, click the Add together button.
- Type "administrators" and then click the Check Names push. If successfully constitute, your computer name followed by "\Administrators" should appear. For instance, Promise\Administrators.
- Click Ok.
After following the steps above, the business relationship is part of the ambassador's group and has administrative rights on that reckoner.

macOS
- In the menu bar, click the Apple icon to open the Apple menu.
- In the Apple menu, select the System Preferences choice.

- Click the Users & Groups icon.

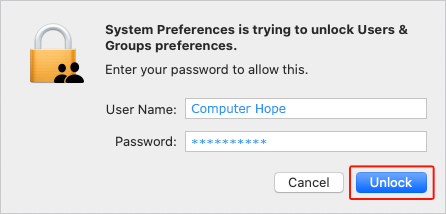
- Click the lock symbol in the lower-left corner of the Users & Groups window.
![]()
- When prompted, enter your password and click the Unlock button.
- On the left side of the window, select the account you want to add administrative privileges (A), then check the box side by side to Allow user to administer this business relationship (B).

Source: https://www.computerhope.com/issues/ch001899.htm
Posted by: brassyousit.blogspot.com
0 Response to "How To Change Administrator Name In Windows 7"
Post a Comment